Iris 3D Shadowbox - Flower SVG: A Guide to Crafting Depth and Detail
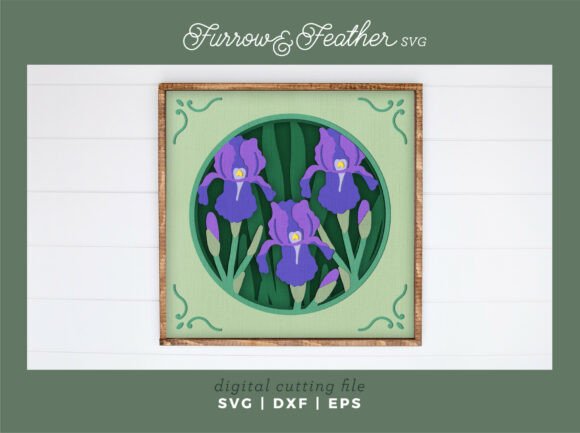
There is a distinct charm in creating wall art that captures the fleeting beauty of spring. The Iris 3D Shadowbox - Flower SVG offers crafters a sophisticated way to bring garden irises into their homes without needing advanced artistic skills. This design, featuring three purple irises set against a lush garden backdrop, transforms flat cardstock into a dimensional masterpiece. Whether you are preparing a heartfelt gift for Mother's Day, decorating for Easter, or simply adding a touch of nature to your bookshelf, this project bridges the gap between simple paper cutting and professional-looking decor.
However, moving from a digital file to a physical, multi-layered shadow box introduces specific challenges. Many creators rush into the process assuming that because they own a machine like the Cricut Joy Xtra or Silhouette Portrait, the result will automatically be perfect. In reality, the difference between a stunning display and a frustrating assembly often lies in understanding how 3D files behave differently than standard cut files. Let’s explore how to avoid common pitfalls and ensure your iris shadowbox looks as beautiful as it does on screen.
Understanding the Dimensions and Scale
One of the most frequent misunderstandings with the Iris 3D Shadowbox - Flower SVG involves scaling. The design is originally sized at 8×8 inches before resizing. While the file is technically scalable to any size, there is a critical threshold where quality begins to degrade. Beginners often attempt to shrink these designs significantly to fit smaller frames or cards, not realizing that the intricate details of the iris petals and garden foliage rely on specific line weights and layer spacing.
If you downsize the design too aggressively, the small details on layers 4, 5, and 6 can become indistinguishable or fail to cut cleanly. This results in fragile pieces that tear during weeding or assembly. Instead of shrinking the entire design, consider keeping the original proportions or only slightly adjusting the scale. If you must resize, test a single layer first to ensure your machine can handle the reduced detail. Remember, the goal is to preserve the delicate texture of the flowers, which gives the shadowbox its depth.
Material Selection and Color Strategy
The visual impact of this project relies heavily on your choice of materials. The design features three purple irises, but the instructions explicitly encourage changing the cardstock colors for layers 4, 5, and 6. A common mistake is using the same shade of purple for every layer or selecting colors that do not offer enough contrast. Without variation, the "3D" effect collapses, and the flower appears flat.
To achieve the intended depth, you should select a gradient of purples or complementary tones. For example, use a deep violet for the base layers and lighter lilacs or soft lavenders for the top petals. This color progression mimics natural light hitting a real flower. Additionally, the type of cardstock matters immensely. Standard printer paper is too flimsy for a shadow box; it will warp and lack the rigidity needed to stand up inside the frame. Opt for high-quality cardstock, ideally 65lb to 110lb weight, which holds its shape well while still being easy to cut.
Navigating Layer Assembly and Adhesion
The true magic of the Garden Irises Shadowbox happens during assembly. The file comes with numbered layers to simplify this process, yet many crafters overlook the importance of precise alignment. When stacking multiple layers, even a millimeter of misalignment can throw off the perspective, making the flower look lopsided rather than blooming outward.
A practical approach is to use a registration tool or a dedicated shadowbox jig if you have one. If you are assembling by hand, work on a clean, flat surface and align the bottom corners of each layer before applying adhesive. Do not glue all sides at once. Apply a small amount of adhesive to the center and one corner, then press gently to check alignment before committing to the full bond. This method allows you to correct minor shifts before the glue sets.
Furthermore, the spacing between layers is crucial. If the layers are glued directly against one another, the 3D effect is lost. You need to create gaps using foam tape or double-sided adhesive squares. These spacers lift each petal slightly above the previous one, allowing light to cast shadows within the box. Neglecting this step is the primary reason why DIY shadowboxes often look flat despite having multiple layers.
Machine Compatibility and Cutting Settings
This design is compatible with popular machines like the Cricut Joy Xtra and the Silhouette Portrait, fitting comfortably on standard 8.5 x 11-inch cardstock. However, compatibility does not mean a "one-size-fits-all" setting. A frequent error is using default blade settings for thin paper when working with thicker cardstock required for this project. This leads to incomplete cuts, especially around the fine details of the iris stamens and leaves.
Before cutting your final project, always run a test cut on the actual material you plan to use. Adjust the pressure and blade depth until the machine slices through cleanly without dragging the paper. If you are using a Silhouette, ensure your mat has strong grip, as the larger surface area of the 8x8 design can shift if the adhesive isn't fresh. For Cricut users, verify that the Joy Xtra is calibrated correctly for the specific brand of cardstock, as different brands vary in density.
Evaluating the Final Presentation
Once assembled, the presentation determines whether the piece feels like a thoughtful gift or a hurried craft. This design looks particularly striking hanging on a wall or displayed on a bookshelf, acting as a focal point for your decor. To elevate the finish, choose a shadowbox frame with a deep enough profile to accommodate the stacked layers without crushing them. An 8x8 frame is ideal, but ensure the glass sits slightly away from the artwork to prevent smudging.
Consider the lighting in the room where you plan to display it. The interplay of light and shadow is what brings the irises to life. Placing the box near a window or under a warm lamp will highlight the layered petals and make the purple hues pop. Conversely, placing it in a dark corner may render the subtle color gradients invisible.
Making an Informed Decision
Before downloading or purchasing the Iris 3D Shadowbox - Flower SVG, take a moment to assess your current setup. Do you have the necessary tools for precision assembly? Is your workspace large enough to handle 8x8 inch projects? Are you comfortable experimenting with color palettes? If you are new to 3D crafting, start with a simpler version of the file or practice with scrap paper first.
This project is a wonderful opportunity to create something memorable, perhaps echoing the sentiment that your grandmother would have loved to receive such a beautiful, handmade gift. By paying attention to scale, material quality, layer spacing, and machine settings, you can avoid the frustration of wasted supplies and time. With careful planning and execution, this garden of irises will become a cherished piece of art that celebrates the season and your creativity.